Self-hosted live streaming with OBS & GStreamer

So recently I needed to do a small live stream for 3 to 4 people and due to the nature of the stream, watching Peter Jackson’s “Bad Taste” movie, using Twitch or Youtube was out of the question, so I decided to host my own and give the attendants a link to this site where they would be able to watch the stream live.
Live stream page can be accessed by clicking here. Most likely you will find a placeholder stream 99.9% of the time.
Playing HLS
This section was no trouble, the hls.js project has you covered. In particular, adapting the simple basic usage demo was trivial to do.
Configuring the HTTP server
A few minor things need to be configured on the HTTP server for it to correctly serve HLS media, namely, disallowing cache, COORS and CSP. All examples will focus on nginx since that is the server I use, but the concepts are the same for any other server.
Disable caching
For serving HLS media, the HTTP server must provide an ever-changing .m3u8
file that shall not be cached, and a number of MPEG-TS files that would benefit
from being cached if you are behind a caching proxy (Cloud Flare et al) but
for simplicity, we will not do the distinction and just tell the clients to
never cache HLS files.
On nginx, presuming our HLS files lie on the /live directory, we would need
to have the following header:
location /live/ {
  # [...]
  add_header Cache-control "no-store";
}
Sorta disable caching
This is an update to the previous “Disable caching” section.
To take advantage of a caching service, it is desirable to allow caching of the
.ts video segments while explicitly forbidding the caching of .m3u8
playlists. Video segments are not long lived so we shall tell the cache to
store them for us for a few minutes at most. An nginx configuration that
implements this would look like:
#Playlists are never cached (*.m3u8)
location ~ \.m3u8 {
  # [...]
  add_header Cache-control "no-store";
}

#MPEG-TS files may be cached for a short time
location ~ \.ts {
  # [...]
  add_header Cache-control "public, max-age=300";
}
These rules apply to all .ts and .m3u8 files, this shouldn’t be an issue
on almost any setup.
Cross-Origin Resource Sharing (CORS)
Most current browsers comply with the Cross-Origin Resource Sharing (CORS)
that means we must explicitly allow the usage of our resources by clients,
be it clients using our own server o clients from others, hence the cross-origin
thing. The HTTP header Access-Control-Allow-Origin controls this behaviour.
If we want to allow anyone to watch the HLS stream from anywhere, we may add the
following header to the HLS files being served. Again, presuming the HLS files
are on the /live directory, we may add the following config:
location /live/ {
  # [...]
  add_header Access-Control-Allow-Origin "*";
}
Or if we only want the HLS feed to be playable from the same host (origin) and only over https, we can restrict it using this instead:
location /live/ {
  # [...]
  add_header Access-Control-Allow-Origin https://$host;
}
Content Security Policy (CSP)
If you are using a Content Security Policy (CSP) to protect your clients from
XSS and other threats, as you should be doing, you would need to accommodate
for some needs hls.js has to function properly. The bare minimum required are
allowing blob: on the media-src field, and allowing loading hls.js itself,
be it with a default policy set to 'self' or by explicitly having a
script-src policy.
These policies may apply to the while site if you feel comfortable with them or they may be applied to just the location serving the HLS player. For example, a host wide CSP would look like this:
server {
  # [...]
  add_header Content-Security-Policy "default-src https: 'self';  script-src 'self'; media-src 'self' blob:;";
  # [...]
}
And presuming the player files lie under /player the configuration would move
into the relevant location block:
location /player/ {
  # [...]
  add_header Content-Security-Policy "default-src https: 'self';  script-src 'self'; media-src 'self' blob:;";
}
Warning! A miss configured CSP will break your site! Make sure to modify your existing, working, CSP instead of copy & paste the one described here or otherwise not use a CSP at all if you weren’t using one already or feel comfortable not having one.
Generating HLS streams
To feed the player, the HTTP server needs to provide the .m3u8 playlist and
the chunked MPEG-TS media content. A quick way to do this with minimum effort
is using GStreamer on the server side.
GStreamer is commonly available on popular linux distributions and can take advantage of hardware-accelerated encoding and decoding of formats supported by vaapi along more common encoders/decoders like libav or x264.
These commands will generate a playlist.m3u4 and a number of .ts files
which will be used by the HLS player. These must be served by the HTTP
server and must not be cached. Make sure the Cache-Control headers are
adequate.
Sample HLS stream
A sample HLS stream feed can be generated using GStreamer with the
following gst-launch-1.0 command:
gst-launch-1.0 \
  audiotestsrc ! avenc_aac bitrate=64000 ! queue ! muxer. \
  videotestsrc ! vaapih264enc ! queue ! muxer. \
    mpegtsmux name=muxer ! queue ! clocksync ! \
      hlssink playlist-length=3 target-duration=5
This will generate a color bar pattern with a sine wave audio tone, video is encoded with the h264 codec using the vaapi hardware-accelerated encoder while audio is compressed using libav AAC encoder.
Broadcasting a video file
This example takes an MP4 file and broadcasts it live. Video is already h264 + AAC so it will be just remuxed into MPEG Transport Stream.
gst-launch-1.0 \
  filesrc location=bad-taste.mp4 ! qtdemux name=demux \
    demux. ! queue ! "video/x-h264" ! h264parse ! muxer. \
    demux. ! queue ! "audio/mpeg,mpegversion=4" ! aacparse ! muxer. \
      mpegtsmux name=muxer ! queue ! clocksync ! \
        hlssink playlist-length=3 target-duration=5
Broadcasting the current desktop
In this example (for Linux only) the current desktop is captured and compressed using hardware accelerated encoding for video. This setup requires the HTTP server to be running on the same machine.
#Select audio monitor source from pulseaudio
#This will vary on other setups. For example:

#I use this one when connected to my TV
SOURCE_DEV="alsa_output.pci-0000_00_1f.3.hdmi-stereo-extra1.monitor"
#And this one when connected to the speakers
SOURCE_DEV="alsa_output.pci-0000_10_00.3.analog-stereo.monitor"

#Create HLS stream using hardware video encoders and FDK AAC for audio
gst-launch-1.0 \
  ximagesrc ! \
    queue ! videoconvert ! vaapih264enc ! queue ! muxer. \
  pulsesrc device="$SOURCE_DEV" ! \
    audioresample ! audioconvert ! "audio/x-raw,rate=44100,channels=1" ! \
    fdkaacenc ! queue ! muxer. \
  mpegtsmux name=muxer ! hlssink playlist-length=3 target-duration=5
Live broadcasting using OBS
This will set up an SRT server that OBS can broadcast to, then remux the stream into HLS for the player to consume. On the GStreamer side the command is the following:
gst-launch-1.0 \
  srtsrc uri="srt://:7001?mode=listener" ! tsdemux name=demux \
    demux. ! queue ! "video/x-h264" ! h264parse ! muxer. \
    demux. ! queue ! "audio/mpeg,mpegversion=4" ! aacparse ! muxer. \
      mpegtsmux name=muxer ! queue ! \
        hlssink playlist-length=3 target-duration=5
On the OBS side, the configurations would look like:
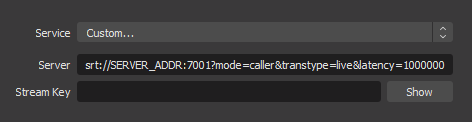
srt://[ADDRESS]:[PORT]?mode=caller&transtype=live&latency=1000000
Keep in mind the server is doing no authentication of any kind so keep the SRT server bound to a local IP or otherwise outside the open internet.
Broadcasting using VLC
This setup will send an MPEG-TS stream over RTP with VLC. On the server side we will need the following command:
gst-launch-1.0 \
  udpsrc port=5004 caps="application/x-rtp" ! rtpmp2tdepay ! \
  tsdemux name=demux \
    demux. ! queue ! "video/x-h264" ! h264parse ! muxer.
    demux. ! queue ! "audio/mpeg,mpegversion=4" ! aacparse ! muxer. \
      mpegtsmux name=muxer ! queue ! \
        hlssink playlist-length=3 target-duration=5
On the VLC side, the “Stream…” option on the File menu, the following steps shall be followed:
- Add a new “RTP / MPEG Transport Stream” destination
- Enter the correct Address/Port values
- Add a stream name (any)
- If file is not already MPEG-TS containing h264 + AAC enable transcoding with the following options:
- Encapsulation:
MPEG-TS - Video codec:
H-264 - Audio Codec:
MPEG 4 Audio (AAC)
- Encapsulation:
- Click “Stream” on the final screen
RTP does not allow any authentication so keep the server socket outside of the public internet.